In the field of policy-controlled robotics, the inability to guarantee that an update is both effective and safe remains a top reason for commercial failure. This is where automated testing gets important. In this post, we implement tests for a Unitree Go2 robot controlled by an RL policy to execute waypoint missions.
We will focus only on testing here, but you can find the full project source on github. Feel free to jump right in. We tried to make spinning up the demo and getting the robot walking as quick and simple as possible.
This post assumes that you're familiar with Python and pytest, as well as having some experience with robotics development and simulation.
The stack we will use:
- dora-rs is a Rust based robotics framework. Its simplicity, low latency, and ease of integration make it a great choice for many robotics projects.
- Isaac Sim allows us to accurately simulate the robot in photo-realistic environments and use the same RL in simulation as well as on the real robot.
- pytest combines well with the Python API of dora-rs
- Artefacts is perfect for test automation and reviewing test results with our teammates.
Unit testing nodes
Simple input-output test
See the full source here
First, we want to know if the policy will calculate the next action without error.
The policy node takes:
- High level navigation commands (x, y, velocity, and rotation)
- Observations from the robot (velocity, joint position, etc.)
- Clock time, which is important to know when the next action should be generated
It returns the low-level joint targets for the robot.
An example test case:
def test_generates_commands():
    """Check if the policy runs and generates joint commands."""
    with patch("policy_controller.main.Node") as MockNode:
        mock_node_instance = MagicMock()
        MockNode.return_value = mock_node_instance

        # Create mock inputs
        command_2d = Twist2D(linear_x=0.5, linear_y=0.0, angular_z=0.0)
        observations = Observations(
            lin_vel=np.zeros(3),
            ang_vel=np.zeros(3),
            gravity=np.array([0.0, 0.0, -9.81]),
            joint_positions=np.zeros(12),
            joint_velocities=np.zeros(12),
            height_scan=np.zeros(154),
        )
        clock = Timestamp.now()

        # The mocked node will yield these events when iterated.
        mock_node_instance.__iter__.return_value = [
            {"type": "INPUT", "id": "command_2d", "value": command_2d.to_arrow()},
            {"type": "INPUT", "id": "clock", "value": clock.to_arrow()},
            {
                "type": "INPUT",
                "id": "observations",
                "value": observations.to_arrow(),
            },
        ]

        from policy_controller.main import main

        main()

        # Check that send_output was called with joint_commands
        mock_node_instance.send_output.assert_called()
        args, _ = mock_node_instance.send_output.call_args
        assert args[0] == "joint_commands"
        joint_commands = JointCommands.from_arrow(args[1])
        assert joint_commands.positions is not None
        assert len(joint_commands.positions) == 12
Importantly:
- We mock dora-rs
Nodewith a MagicMock so we can send inputs directly to the node, and assert that it outputs the correct values. - The input data can be almost anything as long as it's in the correct format. We will only test the shape of the output.
- We can imitate the input data flow by mocking the node's iter values in
mock_node_instance.__iter__.return_value - After the mock is ready, we can import the policy node and execute its
main()function. - The policy node will call the
send_outputfunction on the mocked dora-rs node. This allows us to assert that the expected output was generated using generic pytest assertion tools. - We only validate the format of the output. The integration tests will validate if the robot is behaving correctly.
Testing multistep exchanges between nodes
See the full source here
The navigation node takes:
- The pose of the robot. For this demo, we use the ground truth data from the simulator.
- The waypoint positions that the robot should reach.
- A tick message to trigger generating a new output.
The output will be the high-level navigation command that the policy node will consume.
def test_navigator_logic_stateful():
    """Test the stateful logic of the navigator.

    This test verifies that:
    1. The navigator correctly processes inputs (robot_pose, waypoints) and maintains state.
    2. It generates a 'command_2d' output for every 'tick' input.
    3. The generated commands are correct based on the current robot pose and target waypoint:
       - Moving straight when facing the target.
       - Turning when not facing the target.
    """
    # A queue to send events to the node
    event_queue = queue.Queue()

    with patch("navigator.main.Node") as MockNode:
        mock_node_instance = MagicMock()
        MockNode.return_value = mock_node_instance
        mock_node_instance.__iter__.return_value = iter(event_queue.get, None)

        from navigator.main import main

        # Run the main function in a separate thread
        main_thread = threading.Thread(target=main, daemon=True)
        main_thread.start()

        # Set initial robot pose and waypoints
        robot_pose = Transform.from_position_and_quaternion(
            np.array([0.0, 0.0, 0.0]),
            np.array([1.0, 0.0, 0.0, 0.0]),  # scalar-first (w, x, y, z)
        )
        waypoints = WaypointList(
            [
                Waypoint(
                    transform=Transform.from_position_and_quaternion(
                        np.array([10.0, 0.0, 0.0]), np.array([1.0, 0.0, 0.0, 0.0])
                    ),
                    status=WaypointStatus.ACTIVE,
                )
            ]
        )
        event_queue.put(
            {"type": "INPUT", "id": "robot_pose", "value": robot_pose.to_arrow()}
        )
        event_queue.put(
            {"type": "INPUT", "id": "waypoints", "value": waypoints.to_arrow()}
        )

        # Send a tick to trigger a command calculation
        event_queue.put({"type": "INPUT", "id": "tick", "value": pa.array([])})

        threading.Event().wait(0.1)  # Wait for async operations
        mock_node_instance.send_output.assert_called_once()
        args, _ = mock_node_instance.send_output.call_args
        assert args[0] == "command_2d"
        command_output = Twist2D.from_arrow(args[1])
        assert command_output.linear_x > 0, (
            f"Expected to go towards X direction, got {command_output}"
        )
        assert command_output.angular_z == 0.0, (
            f"Expected to go straight, got {command_output}"
        )

        # Reset mock to check for the next call
        mock_node_instance.send_output.reset_mock()

        # Set a new robot pose
        new_robot_pose = Transform.from_position_and_quaternion(
            np.array([10.0, 10.0, 0.0]),
            np.array([0.707, 0.0, 0.0, 0.707]),  # Rotated 90 degrees (facing +y)
        )
        event_queue.put(
            {"type": "INPUT", "id": "robot_pose", "value": new_robot_pose.to_arrow()}
        )

        # Send another tick
        event_queue.put({"type": "INPUT", "id": "tick", "value": pa.array([])})

        # Check the new output
        threading.Event().wait(0.1)  # Wait for async operations
        mock_node_instance.send_output.assert_called_once()
        args, _ = mock_node_instance.send_output.call_args
        assert args[0] == "command_2d"
        command_output = Twist2D.from_arrow(args[1])
        assert command_output.angular_z > 0.0, f"Expected to turn, got {command_output}"

        event_queue.put(None)  # Signal the iterator to end
        main_thread.join(timeout=1)  # Wait for the thread to finish
Differences compared to one-step test:
- The node runs in a separate thread. This allows us to let the node spin and wait for inputs as it would during normal execution.
- The inputs are passed to a
Queuewhich is shared with the node. We can use it as the mocked input stream by converting it into an iterator withiter(event_queue.get, None) - To wait for the node to finish generating the output inside the thread, we wait in the test with
threading.Event().wait(0.1) - After validating the first output, we continue sending new inputs and testing the newly generated outputs.
- Instead of asserting the exact output values, we only check if the node sends the robot in the correct general direction.
Integration testing
Dora is flexible about how we start the processes implementing the nodes. For example, we can use pytest to start one of our nodes. This allows us to output messages to the rest of the system inside test-cases and validate the received inputs.
The tester node is implemented as a pytest test file. For the full source, see test_waypoints_poses.py and conftest.py. Here we will only discuss the key parts:
- The dora-rs node is provided to the tests as a session fixture. This allows us to reuse the same node between test-cases.
@pytest.fixture(scope="session")
def session_node():
    """Create a Dora node for the full test session."""
    node = TestNode()
    yield node
    # Send the stop signal to tear down the rest of the nodes
    node.send_output("stop", pa.array([True]))
- The simulation is executed at different speeds on faster and slower machines. To make the test timeouts hardware-agnostic, we need to use simulation time in the tests. See the full implementation in conftest.py
@pytest.fixture(scope="function")
def node(request, session_node: TestNode):
    """Provide TestNode that will reset the timeout before and after each test.

    Use `@pytest.mark.clock_timeout(seconds)` to set timeout per test.
    """
    # Reset timeout before and after each test
    session_node.reset_timeout()
    # Try to read the clock_timeout marker from the test function
    clock_timeout = request.node.get_closest_marker("clock_timeout")
    if clock_timeout:
        session_node.set_timeout(clock_timeout.args[0])
    yield session_node
    session_node.reset_timeout()
- Isaac Sim can take a long time to start. Instead of restarting it for each scenario, we send a
load_scenemessage to thesimulationnode. This will trigger thesimulationnode to reset the world and load a new scene in seconds.
node.send_output(
    "load_scene", msgs.SceneInfo(name=scene, difficulty=difficulty).to_arrow()
)
- We can use the built-in parameterization feature of pytest to validate the robot behavior in different configurations.
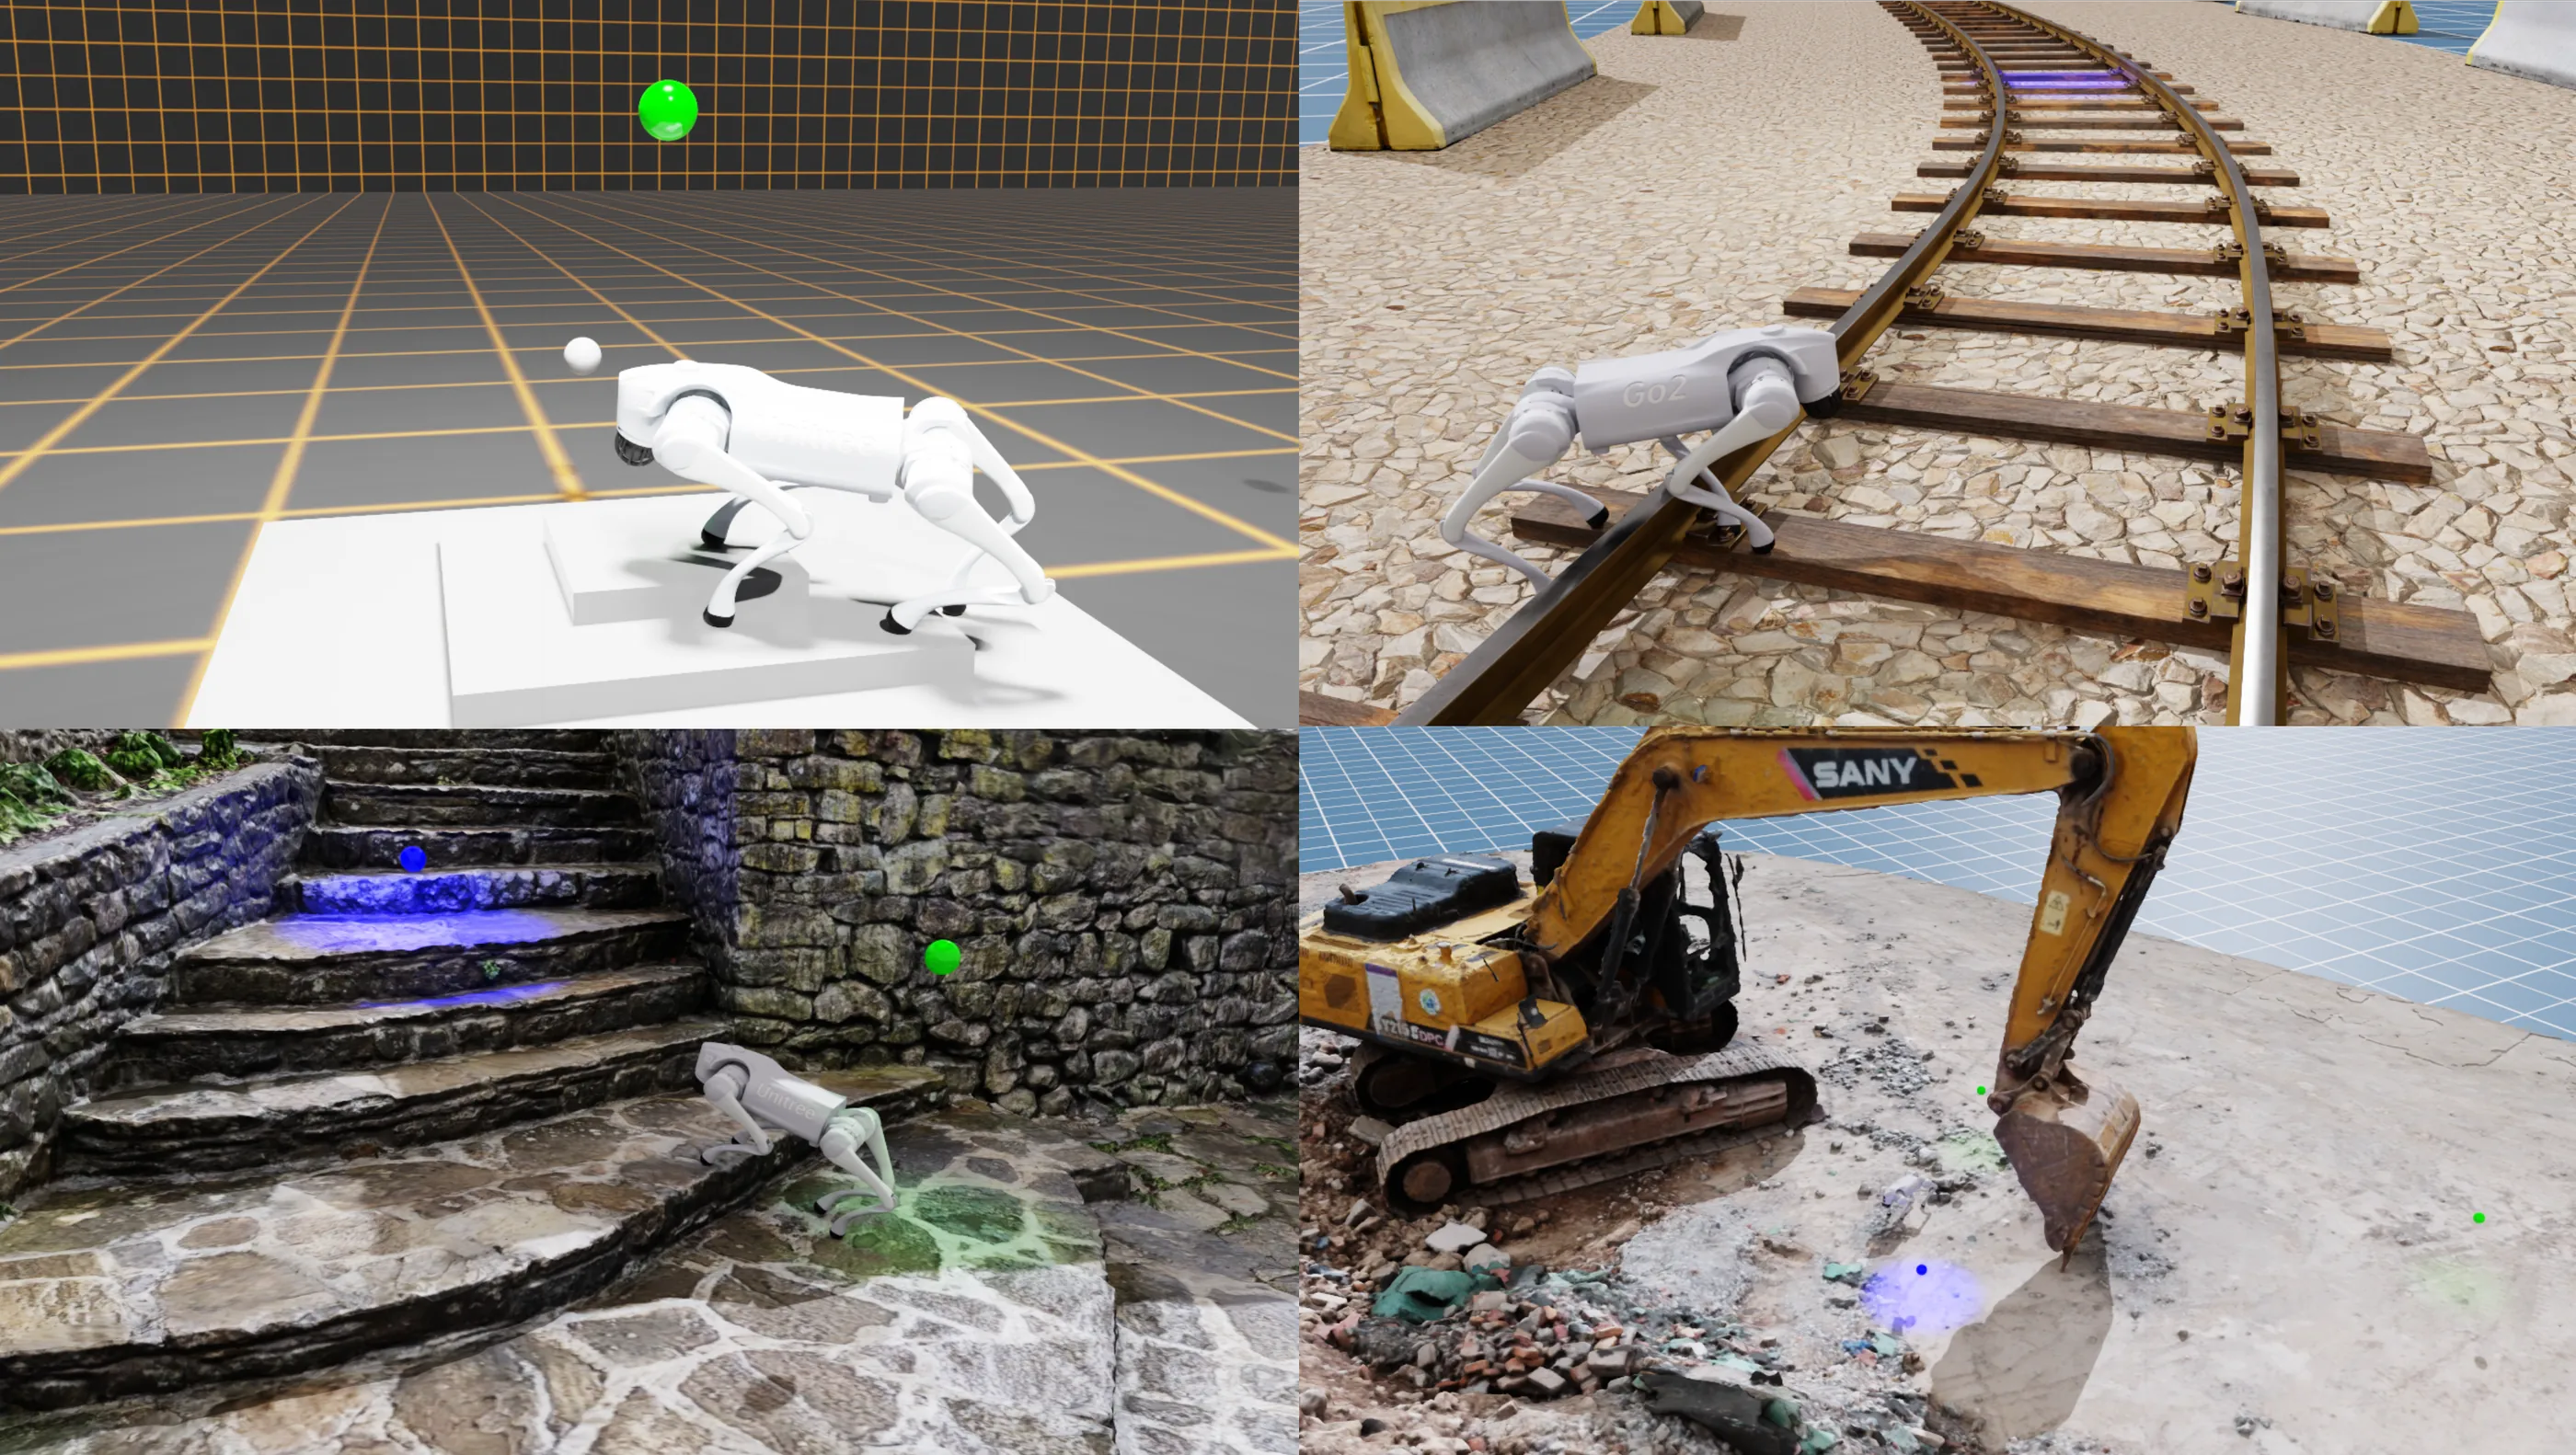
@pytest.mark.parametrize("difficulty", [0.1, 0.7, 1.1])
@pytest.mark.clock_timeout(30)
def test_completes_waypoint_mission_with_variable_height_steps(node, difficulty: float):
    """Test that the waypoint mission completes successfully.

    The pyramid steps height is configured via difficulty.
    """
    run_waypoint_mission_test(node, scene="generated_pyramid", difficulty=difficulty)


@pytest.mark.parametrize("scene", ["rail_blocks", "stone_stairs", "excavator"])
@pytest.mark.clock_timeout(50)
def test_completes_waypoint_mission_in_photo_realistic_env(node, scene: str):
    """Test that the waypoint mission completes successfully."""
    run_waypoint_mission_test(node, scene, difficulty=1.0)
Run all the Tests with Artefacts
Artefacts uses a configuration file for orchestrating the test jobs. Here, we will only list the most relevant configuration options, but you can see the complete configuration in the artefacts.yaml
project: artefacts-demos/go2-demo
version: 0.1.0

jobs:
  unit_tests:
    ...
    scenarios:
      settings:
        - name: navigator_unit_tests
          pytest_file: "nodes/navigator/tests"

        - name: policy_controller_unit_tests
          pytest_file: "nodes/policy_controller/tests"

  waypoint_missions:
    ...
    scenarios:
      settings:
        - name: report_based_waypoint_mission_test
          run: "uv run dataflow --test-waypoint-report"

        - name: pose_based_waypoint_mission_test
          run: "uv run dataflow --test-waypoint-poses"
nameis the identifier for the scenario on the Artefacts dashboard.pytest_filewill run the test on the given path with pytest and upload the results.runallows us to execute any command as our scenario.
See the documentation for all the available configuration options.
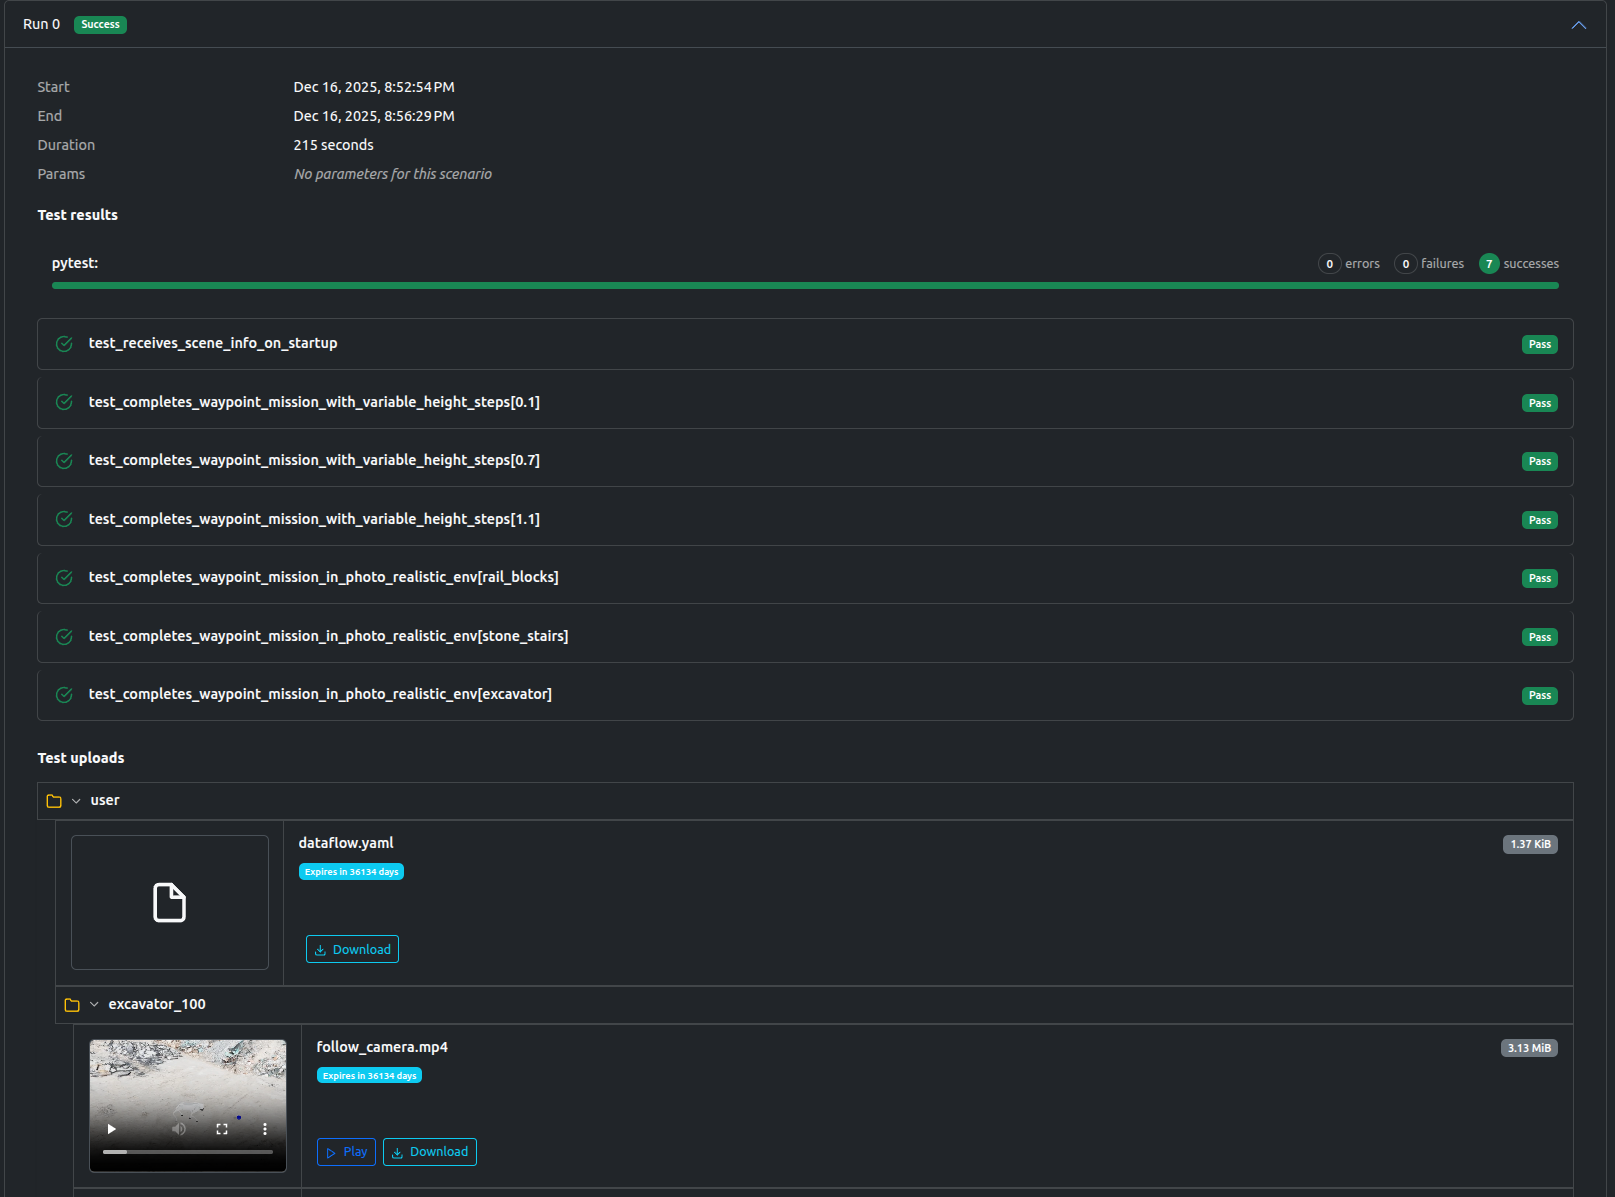
The Artefacts dashboard provides a centralized view of all job executions, whether run locally or in the cloud. Within each job page, users can granularly review scenario results and inspect generated artifacts, including charts, video recordings, and ROS bags.
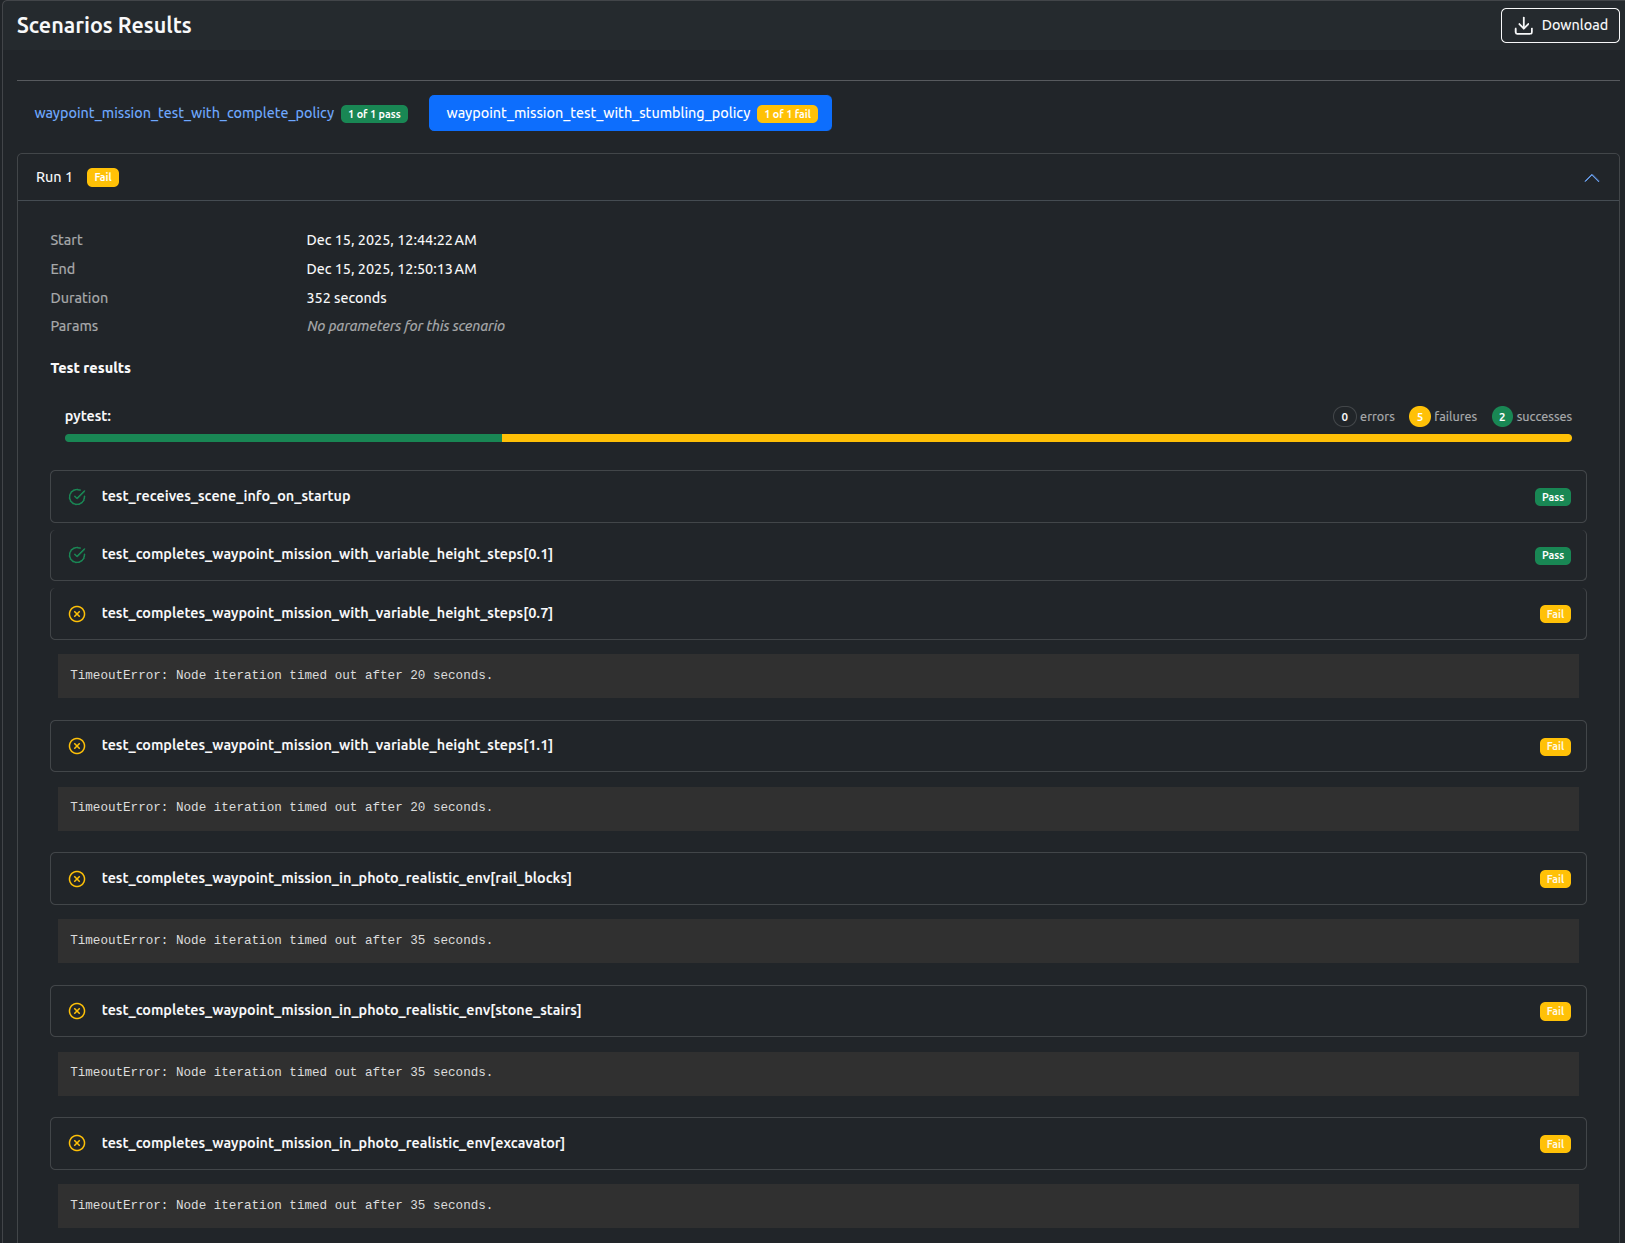
Here, we can see that the "stumbling" policy only passed the simplest mission and failed on all the rest, while the scenario using the "complete" policy passed.
Examining the outputs, we can clearly see why one of the tested policies are failing to complete the tests in time:
To achieve this, we just had to add two scenarios to our artefacts.yaml with different policy parameters.
...
    scenarios:
      settings:
        - name: waypoint_mission_test_with_stumbling_policy
          run: "uv run dataflow --test-waypoint-poses --policy stumbling"

        - name: waypoint_mission_test_with_complete_policy
          run: "uv run dataflow --test-waypoint-poses --policy complete"
You can browse the all the outputs of this project and many others if you create a free artefacts account and select the artefacts-demos organization.
This project is fully open-source and available here